


For Product Registration and general enquires please contact us

Black Turtle
$6.99 – $219.99
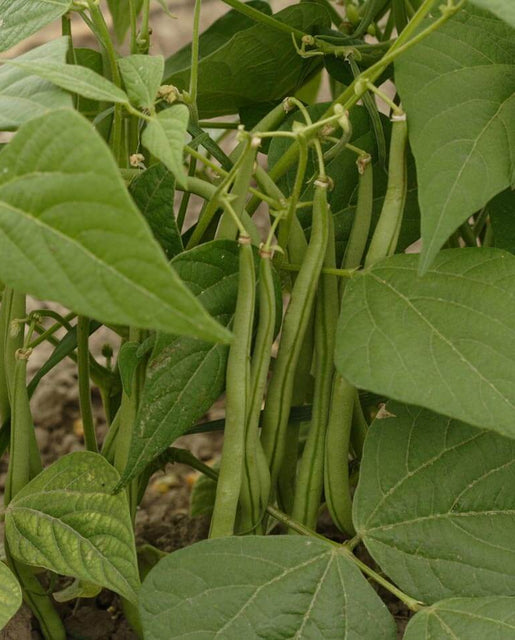
The plants are “semi-runners,” meaning they grow on bushes that benefit from some support. The plants are super productive. A single plant can produce up to 36 pods, each containing 6-8 seeds.
Shipping & Returns
West Coast Seeds ships anywhere in North America. However, we are not able to ship garlic, potatoes, asparagus crowns, bulbs, onion sets, Mason bee cocoons, or nematodes outside of Canada. We regret, we cannot accept returns or damages for orders outside of Canada. The minimum shipping charge to the US is $9.99.
Description
More details about Black Turtle
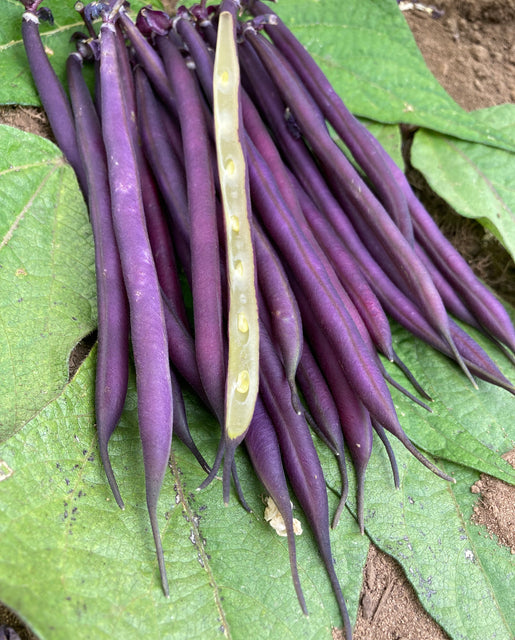
This old heirloom has been grown for over 150 years. The plants are “semi-runners,” meaning they grow on bushes that benefit from some support. The plants are super productive. A single plant can produce up to 36 pods, each containing 6-8 seeds. These tasty beans turn from black to dark brown when cooked. This bean is disease resistant, heat resistant, and hardy. Plant a 100 foot row of Black Turtle Drying bean seeds and expect to harvest 80 to 100 lbs of fresh seeds.
Matures in 80 days. (Open-pollinated seeds)-
- Heirloom grown for 150 years
- Tasty drying bean for soups
- Disease resistant, heat resistant, and hardy
- Matures in 80 days
- Open pollinated
All About Black Turtle
Latin
Phaseolus vulgaris
Family: Fabaceae
Difficulty
Easy
Season & Zone
Season: Warm season.
Exposure: Full-sun.
Timing
Sow as early as possible for dry beans, in late spring, once the soil warms up a bit so plants can mature before wet weather sets in. Optimal soil temperature: 21-32°C (70-90°F).
Starting
Sow seeds 2-5cm (1-2″) deep, 5-8cm (2-3″) apart, in rows 45-60cm (18-24″) apart. Thin to at least 15cm (6″) apart in each row. If the weather is too wet, beans can also be started in pots indoors and set out carefully a few weeks later. Seeds will sprout in 8-16 days, depending on conditions.
Growing
Ideal pH: 6.0-6.5. Well drained, warm soil in full sun is best. Raised beds help with both drainage and warmth. Use 1 cup of complete organic fertilizer for every 3m (10′) of row. Too much nitrogen in fertilizer or manure may cause poor pod set and delayed maturity. If beans flower but do not set pods, the cause can be zinc deficiency. Try spraying the plants with kelp based fertilizer. Wet leaves on crowded plants are subject to diseases. Thin plants to increase air circulation and avoid touching the leaves while they are wet.
Harvest
Stop all watering when the first pods start drying out. Harvest when the seedpods are straw coloured. Pull the plants up by the roots and hang to dry. To shell the beans bash them back and forth inside a bag or pillowcase. Or shell them individually by hand. Do not pick until pods are dry. The beans themselves can then be set somewhere out of direct sunlight, where air movement is good, for a further week to insure even dryness.
Diseases & Pests
Cutworms and root maggots can attack seeds and seedlings. Allowing for good air circulation between plants, and taking care not to over fertilize can slow foliar disease, both fungal and bacterial. When thinning your seedlings try to keep enough space in between for air circulation to reduce disease incidence.
Companion Planting
Beans fix nitrogen in the soil. Plant with Brassicas, carrots, celery, chard, corn, cucumber, eggplant, peas, potatoes, radish, and strawberries. Avoid planting near chives, garlic, leeks, and onions. Pole beans and beets stunt each other’s growth.


How to Grow Drying Beans
Step 1: Timing
Sow as early as possible for dry beans, in late spring, once the soil warms up a bit so plants can mature before wet weather sets in. Optimal soil temperature: 21-32°C (70-90°F).
Step 2: Starting
Sow seeds 2-5cm (1-2″) deep, 5-8cm (2-3″) apart, in rows 45-60cm (18-24″) apart. Thin to at least 15cm (6″) apart in each row. If the weather is too wet, beans can also be started in pots indoors and set out carefully a few weeks later. Seeds will sprout in 8-16 days, depending on conditions.
Step 3: Growing
Ideal pH: 6.0-6.5 Well drained, warm soil in full sun is best. Use 1 cup of balanced organic fertilizer for every 3m (10′) of row. Raised beds help with both drainage and warmth. Too much nitrogen in fertilizer or manure may cause poor pod set and delayed maturity. If beans flower but do not set pods, the cause can be zinc deficiency. Try spraying the plants with kelp based fertilizer.
Step 4: Germination
Days to maturity: From direct sowing. In optimal conditions at least 75% of seeds should germinate.
Step 5: Harvest
Stop all watering when the first pods start drying out. Harvest when the seedpods are straw coloured. Pull the plants up by the roots and hang to dry. To shell the beans, bash them back and forth inside a bag or pillowcase, or shell them individually by hand. Do not pick until pods are dry. The beans themselves can then be set somewhere out of direct sunlight, where air movement is good, for a further week to ensure even dryness.
Tips!
Wet leaves on crowded plants are subject to diseases. Thin plants to increase air circulation and avoid touching the leaves while they are wet. Diseases & Pests: Cutworms and root maggots can attack seeds and seedlings. Allowing for good air circulation between plants and taking care not to over fertilize can slow foliar disease, both fungal and bacterial. Companion Planting: Beans fix nitrogen in the soil. Plant with Brassicas, carrots, celery, chard, corn, cucumber, eggplant, peas, potatoes, radish, and strawberries. Avoid planting near chives, garlic, leeks, and onions. Pole beans and beets stunt each other’s growth.Additional information
| Matures | in 80 days |
|---|---|
| Season | Warm season |
| Exposure | Full-sun |
| Quantity | 25g, 100g, 250g, 1kg, 5kg |
You must be logged in to post a review.


Reviews
There are no reviews yet.